
Crystalline glaze, a technique worth discovering
Contents
- Understanding crystalline glaze
- Preparing glazes for crystallisationration
- Programming an electric kiln
- Advanced techniques and troubleshooting
- Glaze recipes and results
Introduction
Crystalline glazes, considered an advanced glazing technique, are accessible to the novice potter, provided he or she is given precise advice and follows it carefully. The recent experience of our online glazing course students with these glazes produced such successful results that we decided to share them with you.
We will explain how to choose the right materials, prepare the glaze and set up your kiln with the specific firing conditions for crystal formation. Get ready to discover amazing visual effects!
While this technique is easiest when used in electric kilns with their high temperature precision, it is also suitable for gas kiln users. In both cases, it’s the so-called oxidising firing that interests us.
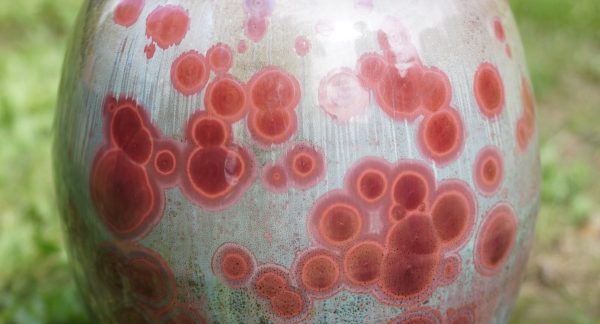
Example of crystalline glaze from our online course. Copper crystalline glaze.
👉 Discover our New Year Eve’s Special Offers up to 50% OFF
Understanding crystallisation
Crystallisation transforms a homogeneous glaze into a structure studded with distinct, often coloured crystals. This transformation occurs during the cooling phase of the firing cycle, when specific conditions allow silica molecules to organise themselves around nuclei to form crystals visible to the naked eye.
The science behind crystalline glazes.
It all starts with the right materials. Crystalline glazes contain a lot of silica. Zinc and lithium can also be added and will make the mixture more fluid at high temperatures, allowing the small silica particles to move more freely. However, it’s important that the glaze doesn’t contain too much alumina, as alumina will make the mixture too stable, preventing crystals from forming properly.
Raw materials
- Frits: Frits are pre-melted compounds, ground into a powder and used as the base for many crystalline glazes. They enable rapid, uniform melting, essential for crystal formation. For good crystallisation, use frits with low alumina and low boron.
- Feldspar: Less commonly used due to its high melting point, feldspar can nevertheless be used as a base for crystalline glazes.. It contributes to the fluidity of glass during cooling, and is a key element in crystal formation.
- Glass powder: Glass powder, often sodium-rich, offers an economical and effective means of creating a vitreous base conducive to crystallisation. It is particularly useful for achieving a variety of textural and colour effects.
- Clay: Crystalline glaze is particularly beautiful on white clay. Porcelain is therefore the preferred medium, although good results can be achieved on light coloured stoneware clays. As the clay has a major influence on the development of crystals,we recommend testing on both white stoneware and porcelain.
The same glaze on porcelain on the left, white stoneware on the right: from our online course.
The right conditions for crystallisation
Crystallisation is not left to chance; it is the result of the precise control of several variables:
- Temperature and cooling rate: crystallisation glazes melt at high temperatures, then are cooled slowly to allow crystals to form. Precise control of cooling temperature is essential, as it determines the size and quality of the crystals formed.
- Chemical composition: in addition to silica, the presence of certain metal oxides can influence crystal colour and clarity. For example, the addition of cobalt produces blue crystals, while copper can give green or red ones, depending on the kiln atmosphere.

Matthieu Liévois, red copper crystallisation, two firings.
How to throw the drip catcher
Crystalline glazes are very runny. To protect your kiln shelves, the pieces are placed on a glaze catcher, or drip catcher, thrown beforehand. Try to use a different clay, as the difference in shrinkage makes it easier to separate the piece from the dish after firing.
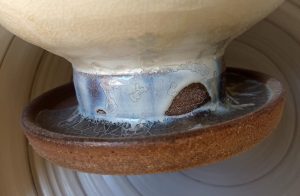
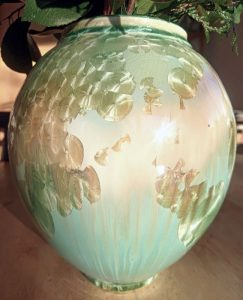
Thrown stoneware dish. It supports a porcelain vase.
Cup and vase are separated by heating the joint with an electric or gas heat gun.
Preparing glazes for crystallisation
For successful crystalline glazes, careful and precise preparation is essential.
Glaze composition
- Choice of materials: make sure your frit or glass powder is low in alumina and boron, as explained above. Be sure to include elements such as zinc and lithium, which promote glass fluidity in high temperatures.
- Mixing the ingredients: as with the preparation of any glaze, the ingredients must be carefully weighed, mixed and sieved. The slightest imprecision can affect crystal growth.
- Adding colourants: metal oxides are added to colour the crystals. Cobalt gives deep blues, copper can produce greens or reds, iron tends to give brownish tones. Each oxide will have a different effect on how crystals reflect light and colour.
Cobalt glaze: from our online course.
Glaze application
The application of glaze is as important as its composition.
- Application: apply the glaze evenly. Uneven application will lead to uneven crystallisation. But if uneven application is both desired and well-controlled, interesting results can be achieved.
- Application methods: glaze can be applied by dipping, spraying or brushing. Dipping ensures complete coverage; spraying enables you to control the thickness, and brush application is often reserved for fine details or touch-ups.
- Drying: once applied, the glaze must be perfectly dry before firing. Inadequate drying can lead to defects and affect crystallisation.
Programming an electric kiln
Electric kilns offer exceptional temperature precision, a crucial factor in crystallisation.
Basic settings
- Temperature rise: a rapid increase in temperature enables the glaze to melt properly. A slower increase can result in premature or uneven crystallisation. Typically, the target temperature for crystallisation is around 1260°C to 1290°C, depending on the glaze used.

- Temperature schedule: once the maximum temperature has been reached, it is essential to programme different ramps during cooling. The process should include a controlled descent, especially from 1280°C to 1100°C, with several intermediate ramps.
Cooling control
Cooling must be precisely managed to allow crystal formation and growth. The kiln must be able to maintain stable temperatures during the ramps and lower them very gradually.
- Programming ramps: the programming of ramps can vary according to the glaze and the desired result. Slow cooling between 1200°C and 1050°C is often recommended. Each stage can last from 15 minutes to several hours, depending on the size and complexity of the desired crystals.
- Monitoring and adjustment: Even the slightest variations in temperature or duration of ramps can significantly impact the results.
Tips to avoid common problems
- Overfiring: avoid overfiring, as it can dissolve crystals and lead to excessive glaze vitrification.
- Distribution: make sure the kiln load is evenly distributed to avoid hotter or cooler zones, which could lead to uneven crystallisation.
- Contamination: keep the kiln clean and well-maintained to avoid contamination during firing.
👉 Learn Glazing from Matthieu’s with our online glazing course currently at 40% OFF
👉 Discover our New Year Eve’s Special Offers up to 50% OFF
Advanced techniques and troubleshooting
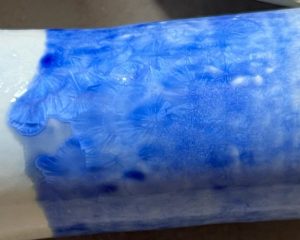
Once you’ve learned the basics of crystallisation, you can develop techniques and strategies, for example applying areas of crystalline glaze side by side with areas of non-crystalline glaze.
Matthieu Liévois
The lighter area corresponds to where a non-crystalline glaze has been applied.
Advanced techniques
- Handling colouring oxides: experimenting with different proportions of metal oxides can dramatically alter the colours and textures of the crystals formed. For example, the gradual addition of cobalt can transform pale blue hues into deep blue, while copper can offer a range from green to red depending on the firing atmosphere.
- Creating specific patterns and effects: applying a non-crystalline glaze in patterns and undercoats will direct crystallisation around these patterns, forming an interesting visual contrast.
- Controlling temperature steps: varying the length and temperature of ramps can influence crystal size and shape. Longer ramps at slightly lower temperatures promote the growth of large crystals, while short, high-temperature ramps can produce smaller, more dispersed crystals.
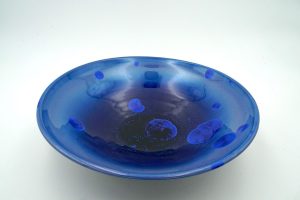
Matthieu Liévois, porcelain bowl, cobalt crystallisation glaze
Troubleshooting
- Crystals not forming: The first thing to do is check the composition of your glaze. Also make sure that the ramps are correctly programmed during cooling.
- Crystals too small or too large: adjust cooling speed and temperature ramps.
- Surface defects: defects such as cracks or bubbles are often due to glaze being applied too thickly or to incompatible material: test the glaze before applying it to a piece.
- Evenness of crystallisation: make sure the kiln is evenly loaded. Monitoring the kiln temperature with a pyrometer is essential.
Practical example and results
To illustrate the principles and techniques of glaze crystallisation, here’s a practical example:
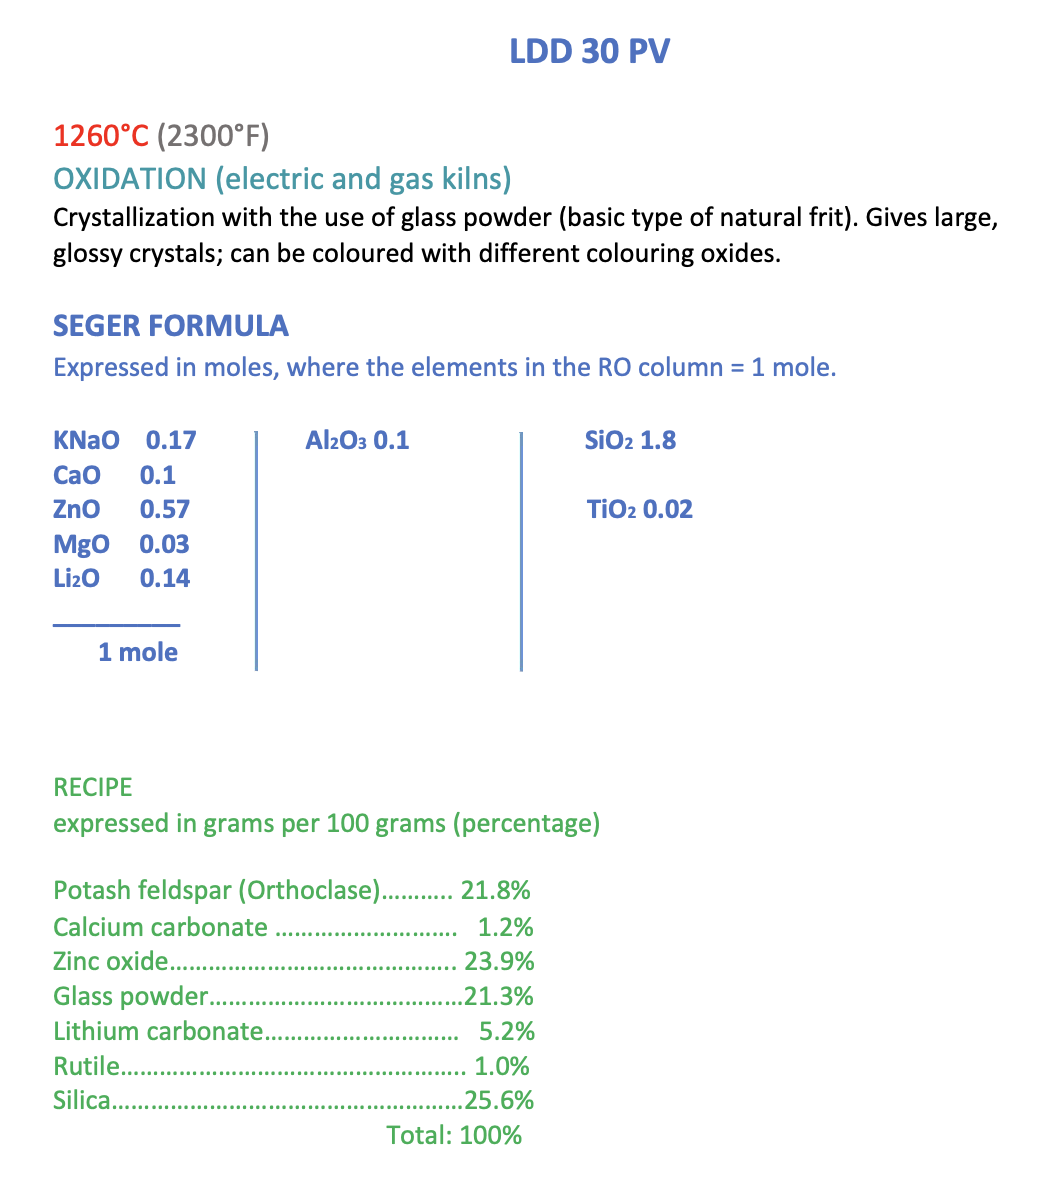
Glaze recipe
- Glaze composition: The glaze used for this example contains a glass powder base, a low alumina content and zinc oxide to promote crystallisation.
- Application: The glaze is applied to porcelain and white stoneware test tiles by dipping. They are air-dried, thus avoiding any residual moisture.
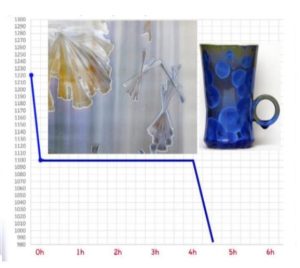
Setting up the electric kiln: reusing previous firing curves.
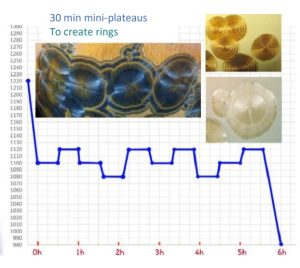
- Temperature rise: The kiln is programmed to rise rapidly to 1260°C, allowing the glaze to melt evenly.
- Temperature ramps: After reaching 1260°C, the kiln is programmed to drop slowly to 1100°C in steps as shown on the curve above, each ramp lasting about 30 minutes.
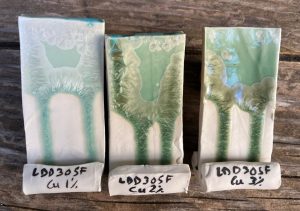
Results
After the kiln has been switched off, the pieces cool naturally. The result is a glaze with well-formed crystals that catch the light:
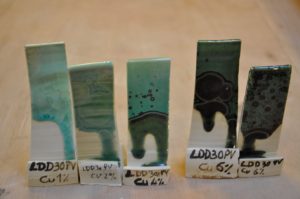
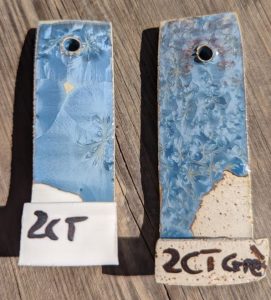
Porcelain test tiles, with a copper progression. For the 6% copper (2 test tiles on the right), the glaze was applied to a porcelain and a white stoneware tile.
Each kiln is different and may require adjustments to achieve similar results. Experimentation is the key to mastering crystalline glazes.
The recipe above illustrates the basic principles of crystallisation and serves as an introduction to the techniques explored in our online courses. For those interested in deepening their knowledge and exploring various techniques and materials, we invite you to investigate our complete courses up to 50% OFF on glaze crystallisation.
")
Resource centre
animated by Matthieu Liévois,
potter-ceramist for over 40 years and founder of the Creamik School
Find all the courses
Keywords
Don’t miss any more news from the Créamik school!
Follow us on the networks
You can also discover…
Less math, better research: Generative Artificial Intelligence in the Ceramic Industry

Garance Lanfray, journey through Southeast Asia

From beginner to professional : choosing the right ceramic courses

Matthieu Liévois, The search for crystals
Can ceramics be fired in a microwave?
Discovering the Art of Japanese Ceramic Masters
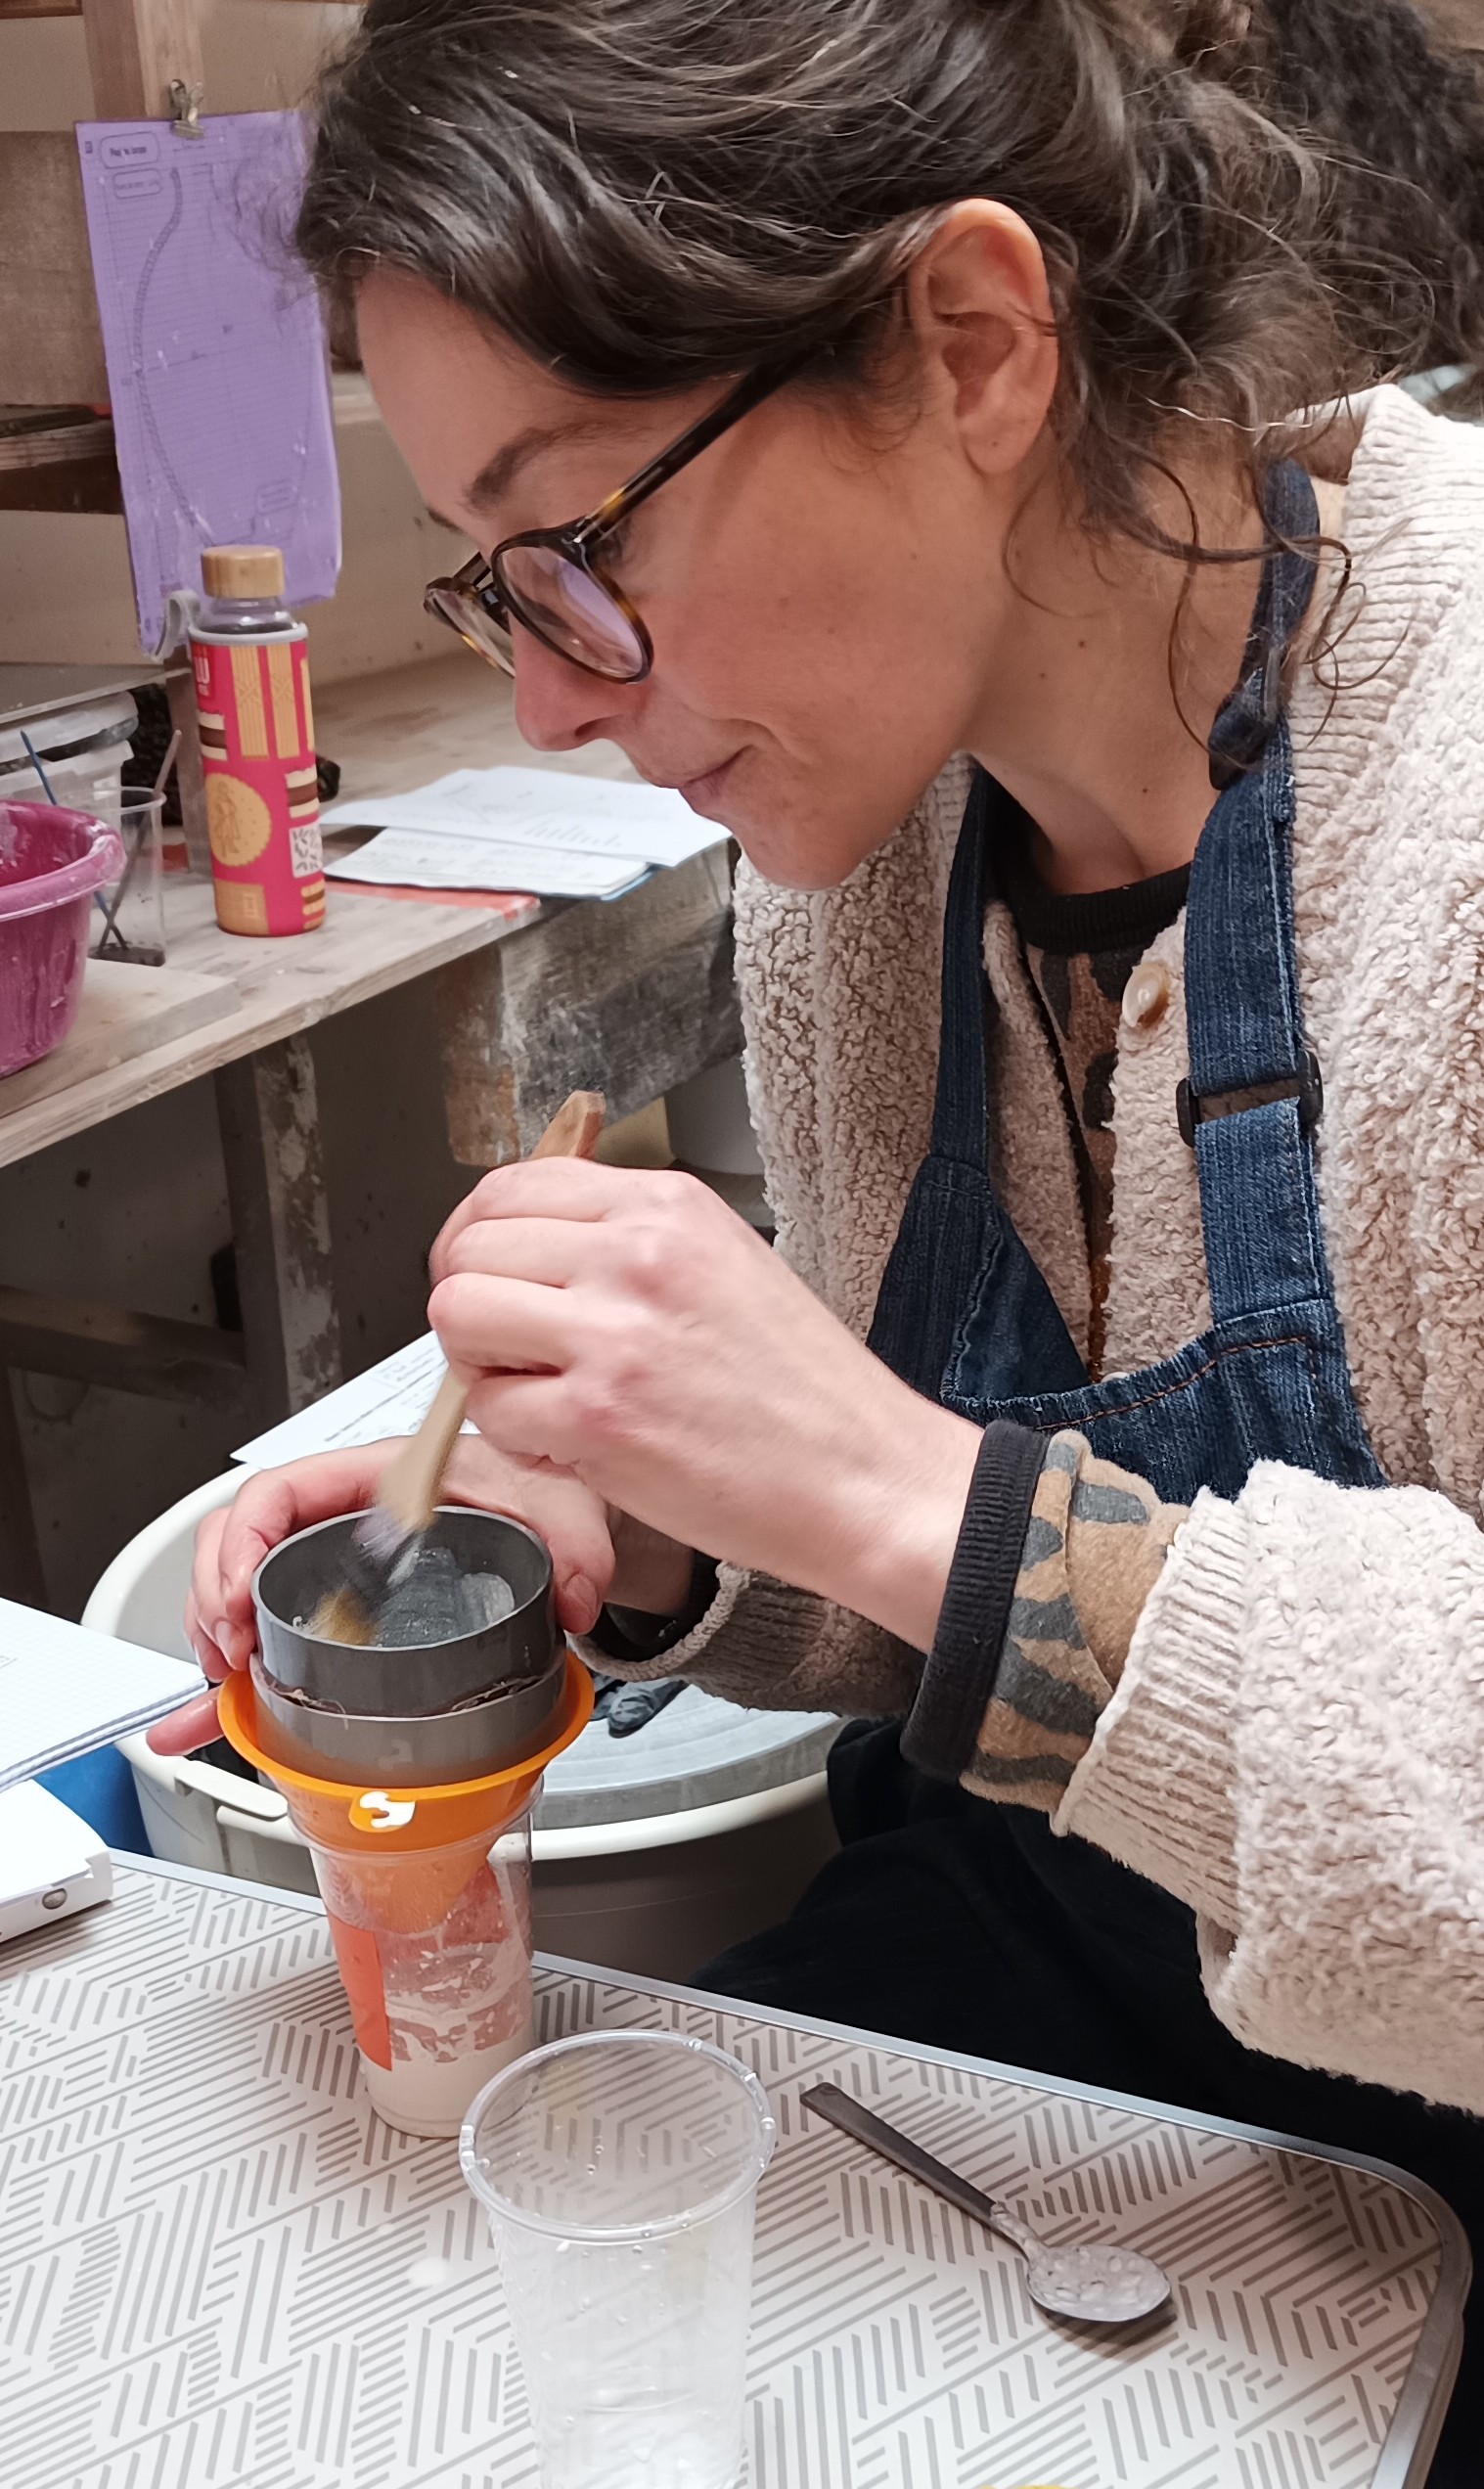
Instructions for making your own sieve